The Moto-Roto Grabber
I guess it's more of an "unscrewer" than a grabber, but you get the idea!
I had been thinking about some sort of motorized device for some time. It was based on Gary's "Suction Cup" design, with a little of Scott's plunger design thrown in for good measure. I needed a small, relatively light but powerful motor. Kenny, one of the guys at work suggested using a motorized screwdriver. And so it came to be..........
I bought a Black & Decker Versapack screwdriver for 10 bucks from one of my friends. I opened it up, and basically took out the switch assembly, since I was only interested in the "unscrewing" function. I connected wires from the battery terminals and motor, and ran them out the hole left by the switch. I attached a ¼ inch phone plug to the wires. A wire runs from the device down to a small box with a doorbell button to actuate the motor. One of the cool things about this is it uses the Versapack rechargeable batteries. You can get a lot of use out of a fully charged battery!
Below are a few photos of the device along with descriptions. It's pretty simple to put together, but if you have any questions, feel free to e-mail me. I'm hoping to have a downloadable PDF file with all the construction steps (as well as all the designs here) soon.
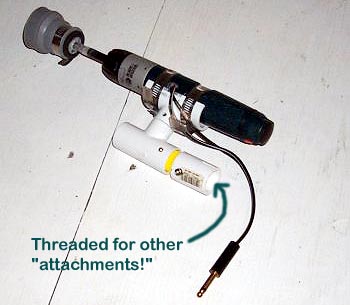
The modified Versapack screwdriver is attached using PVC pipe tees joined together. The yellow part is part of a light bulb changing attachment that screws onto the pole. It fits perfectly inside the PVC pipe. The top part is also threaded so other attachments (like a fork attachment to pick up the insulator) can be added later. |
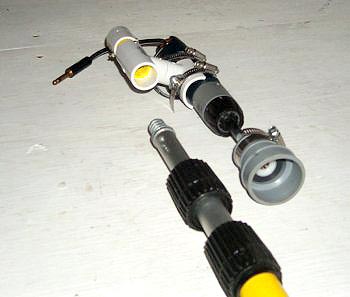
This view shows the threads for attaching it to the pole. The rubber cup is the same one I used in the "Suction Cup" attachment. |
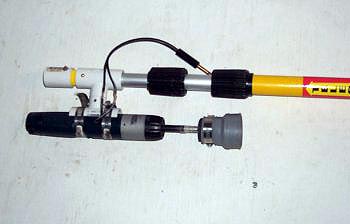
Here's the roto-grabber attached to the pole. The ¼ inch phone plug connects to a cable that in turn connects to the doorbell button. |

Here's the pole with roto-grabber, cable and push button attached. It can be extended to around 20 feet. |
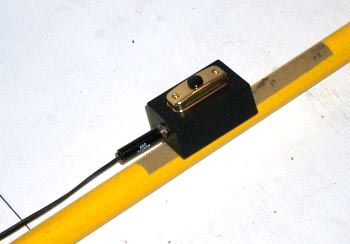
The cable plugs into a box that the doorbell button is mounted on. The box is a small project box available at Radio Shack. The ¼ inch phone plugs & jacks are also available at Radio Shack. The box attaches to the pole with a strip of Velcro |
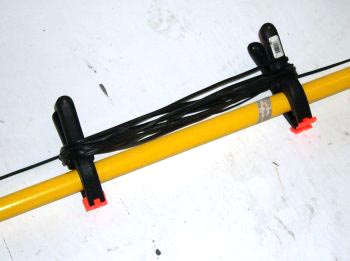
I use a couple plastic clamps from Home Depot to wrap the cable around to keep it under control. |
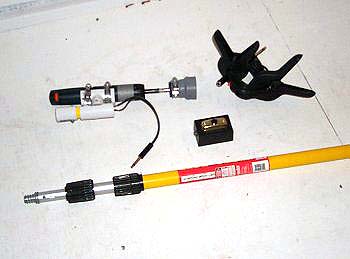
The motorized grabber, pole, push button, cable, & clamps all fit nicely in my minivan. The whole rig can be assembled / dis-assembled quickly in the field. |
The gadget works pretty well as described in the story below. You maneuver the rubber cup on top of the insulator, then press the button. It takes about 5 seconds to fully unscrew an insulator (it takes 4 1/2 turns to get an average insulator off the pin), and you can actually feel it when the insulator comes off the pin. You then use the blunt section to push it off the pin. I am planning on experimenting with some grabber attachments that will screw into the device as described above.
The device is a little heavier than I would like, and 20 feet is about the limit with any kind of controllability. I'm still looking for a lighter-weight motorized option, but for now this will be a lot of fun!
First Test - 11/10/01
Saturday night was one of those beautiful, crisp, clear fall nights when the air is still and the stars sparkle like jewels.
Jo and I departed the House of Shelley a few minutes after 10:00 on a mission to test my new motorized insul-nabber device. Briefly, it’s a modified Black & Decker Versapack electric screwdriver that attaches to my 23-foot extending painter’s pole. The device attaches to the threaded end of the pole, and drives a rubber cup made from a pipe joint. I modified the screwdriver by taking out the switch and replacing it with a ¼-inch phone jack wired to the motor. A length of zip cord (i.e. lamp cord) plugs into it, and the other end plugs into a small box with a doorbell button. The box attaches to the pole with a strip of Velcro.
We arrived at a pole on old Highway 210 just east of Missouri City a little after 10:45 PM. There was a stretch of the old highway that stretched east for a couple hundred feet, ending with a barricade. It was quiet other than a few cars on the new highway, and the stars shining brightly above were spectacular! Close to the barricade was a perfect place to pull off the road and remain pretty well hidden. A pole stands about 20 feet from this spot. We pulled into this parking spot someone so conveniently provided. I shined my big flashlight on the insulators on the top crossarm, which were not tied in.
I jumped out and got my pole, and after stomping a path through the weeds, had Jolene shine the light on an insulator on the top crossarm so I could extend the pole to the right height. I extended it to about 20 feet, which is pretty much the limit of controllability due to the extra weight of this new device.
I attached the motorized un-screwer, and connected the wire, and stuck the trigger box onto the Velcro strip. The first target was an aqua-tinted CD154 on a tramp bracket on the north side of the pole. I raised the device, and after a couple attempts, landed the rubber cup on top of the insulator. I pressed the button, and the torque on the pole was amazing – but the insulator was not turning. It must have been one of those annoying extra-tight ones. As Jolene shined the light on the bracket, I moved to the next insulator. Again, I took a couple attempts, but I got the cup on top of the insulator, and again, hit the button. This time, the insulator turned, and in about 5 seconds I could actually feel it come off the pin! I lifted up, and the cup had enough friction that it actually picked the insulator off the pin! Of course, as soon as it was off, the insulator released, and fell – missing my head by about a foot! Note to self – tilt pole AWAY from my person next time! I recovered the insulator – just a clear (or so I thought) 42, nothing spectacular. When I got the 42 home, I discovered it has just a slight straw/pink tint to it. This may go away once it is cleaned.
I noticed some darker colored insulators on the south side of the pole, so I decided to go after one of those. I had Jolene shine the light on the third one from the end of the crossarm. The lower arm still has inactive wires, but there was a good sized space between wires just under the insulator I selected. Again, I landed the cup on the insulator, and pressed the button. This insulator turned easily, and again, it was off the pole in seconds. This time, I made sure it would miss me by a wider margin! I used a small flashlight to find it, and discovered it was a Kerr CD155 with a slightly greenish tint. Looking at a photo I took a few days earlier, I believe the rest of the insulators on that arm are also Kerrs.
Since it was late, we decided not to press our luck much further, and headed home with our common but still beautiful gems, and a successful test under our belts!
Back to Grabber Page