 |
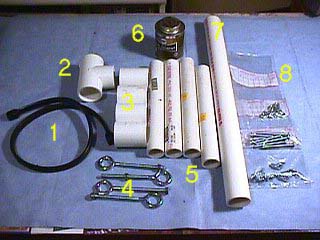
Everything you need can be found at Payless Cashways, or any home-improvement center. Two 10-foot lengths of 1-1/4 inch schedule-40 PVC pipe are cut into 5-foot sections. In addition, you'll need the materials pictured: (1) rubber "bungee" strap (18-20 inches); (2) 1-1/4 inch "tee" fitting; (3) four 1-1/4 inch pipe couplings; (4) four 1/4"-20 eye-bolts; (5) four 10" pieces of 1-inch PVC pipe; (6) 1 can of PVC cement; (7) one 2-foot piece of 1-1/4 inch pipe; (8) Hardware: four 1/4-20 wing-nuts; five 1/4-20 two-inch bolts; 8 - 10 1/4-20 nuts. All this will cost around $20.00. |
 |
Coat the inside of the 5-foot length with PVC cement. WARNING! Use this stuff in a well-ventilated area - or you won't NEED a Snag-A-Lator to get up to those insulators! Insert one of the 10-inch pieces of 1-inch pipe into the larger piece. Insert it to about half its length. Coat the outside of the larger pipe (about a 1-inch coating), and slide one of the couplings onto the larger pipe. Do this on one end of each of the other 5-foot lengths. |
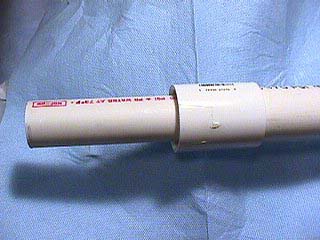 |
This is what it should look like. The 1-inch pipe slides inside the 1-1/4 inch pipe, and the couplings slide on the outside of the 1-1/4 inch pipe. When the sections are coupled together, they are supported inside and outside. |
 |
Drill a 1/4-inch hole BELOW the coupling. This will go through both the 1-1/4 inch pipe, and the 1-inch pipe inside it. |
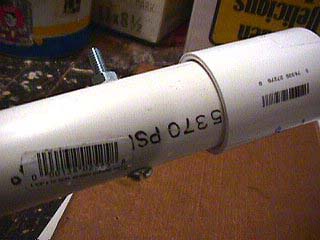 |
Insert a 1/4-20 bolt through the hole, and tighten a nut on it. This will reinforce the glued pipes, and ensure it will not twist when unscrewing an insulator. |
 |
This is how the sections fit together. When they are fitted securely, drill a hole through both pipes ABOVE the coupling. You'll find it helpful to number the sections so you won't have trouble lining up the holes in the field. I started with number 1 at the top, number 2 just below it, number 3 below number 2, and so on. An eye-bolt is inserted through the hole, and secured with a wing-nut. This allows you to store and transport the Snag-A-Lator in 5-foot pieces. When assembled, the eye-bolt keeps the sections from slipping when unscrewing an insulator. |
 |
Here's a close-up of the eye-bolt in place. I find it helpful to place a nut on the eye-bolt, so about 2 inches of it sticks out. You can run the rope through the eye if you like, and it also gives you something to wrap the rope around to hold it while you're working with a stubborn insulator. A wing-nut holds it in place, and allows for easy take-down at the end of a "snag session." |
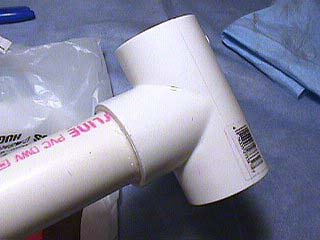 |
Glue the tee fitting to one end of the 2-foot piece of 1-1/4 inch pipe. This will form the "business end" of the Snag-A-Lator. |
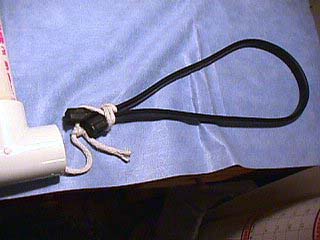 |
The bungee cord is formed into a loop, and secured with rope. Feed the rope through the tee, and into the pipe. |
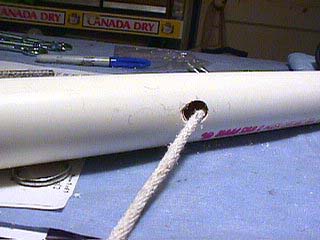 |
Drill a hole (about a half-inch) about 2/3 of the way down the pipe, and feed the rope through it. |
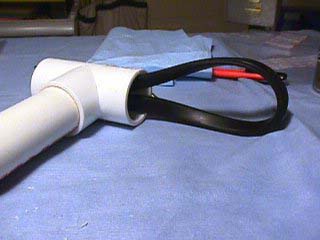 |
When you pull the rope, the rubber loop will slide into the tee. An insulator caught in the loop will be held tightly as you pull on the rope. Once tight, a firm counter-clockwise twist will loosen the insulator. |
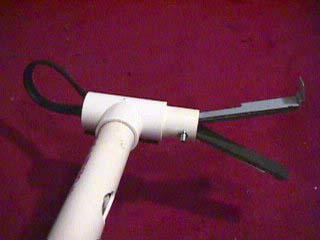 |
Once the insulator is loose, you can pull the loop off of it, and use this "vee" as a wrench. Just keep turning it until it comes off the pin. I made this vee out of a metal strip about 18 inches long. I cut up an old mouse pad, and glued it - rubber side out - to the strip with a hot glue gun. |
 |
The vee is fastened to a short piece of 1-1/4 inch pipe, and pressure fitted into the tee. This arrangement allows for the use of different "tools" interchangeably. The vee was basically just shoved into the pipe, a hole was drilled, and a 1/4-20 bolt inserted to hold it in place. |
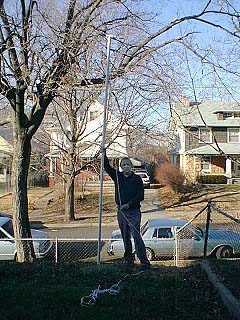 |
Here's Yours Truly with the Snag-A-Lator - two section mode. With the 2-foot section on top, and sections 1 and 2, it's about 12 feet long. Holding this near the bottom, most older poles should be quite accessible. I've added the other 2 sections on to this, and I'll tell you - at 22 feet it's almost more than a single person can control. I wouldn't recommend going over 3 sections. I'll probably use the other two 5-foot lengths to make a second Snag-A-Lator with a highly textured bungee - for those stubborn insulators! |
 Here's a photo of the pole we tried the Snag-A-Lator out on. See those two lower CD-154s? They're not there anymore! |
 Here they are in their new home! The one on the left is the lower one, and the one on the right is the next one up. It's sitting on top of the TV downstairs! |
Hope you enjoyed the article! If you build one of these drop me a line and let me know how it works for you!
Happy "Snagging!"
Previous Page | Improvements to Original Model | The Grabber Page |